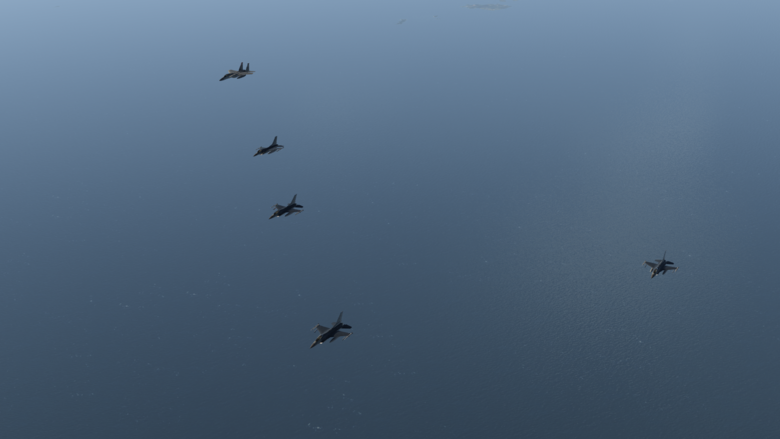
Formations and Manoeuvres
Formations involve flying in specific patterns or arrangements with other aircraft. The purpose of these formations can vary, including optimizing mutual support, improving visibility, or enhancing operational effectiveness; Manoeuvres are specific tactical movements designed to gain an advantage over an opponent or to execute a particular mission objective.
Learning objectives
- Lead, Wingman, Element Lead, and Element Wingman Responsibilities
- Understand why we need to use Tac Formation and Manoeuvers
- Understand Basic Tactical Formation Concepts/Theory
- Execute Basic Tactical Formation
Formations
Formation Responsibilities
The flight lead assigns responsibilities for each flightmember. Dividing responsibilities ensures each pilot has a manageable number of tasks to perform. Flight member normal responsibilities are as follows:
- Number One: Primary planner and decision-maker, primary navigation and radar lookout, visual look out as other responsibilities allow, and primary engaged fighter, if practical.
- Number Two: Maintain formation position and visual lookout. Radar awareness and navigation position awareness, as other responsibilities allow.
- Number Three: Maintain formation on the lead element, secondary navigation and radar monitor, and visual lookout as other responsibilities allow.
- Number Four: Same as Number Two.
Noticed if the lead did not tell the formation side, default side was Right.
Two-Ship Formations
Two-Ship Line Abreast (2-Ship LAB)
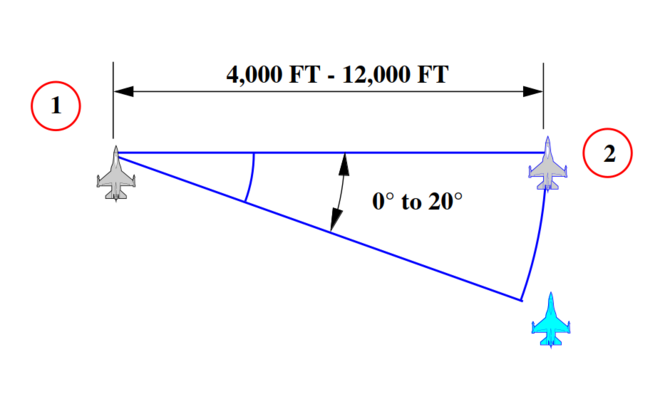
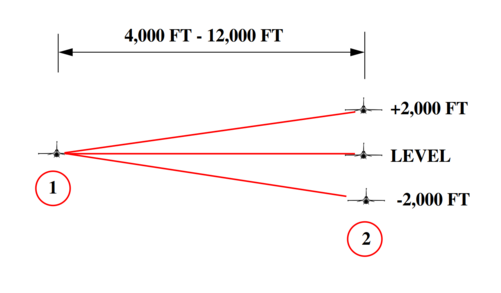
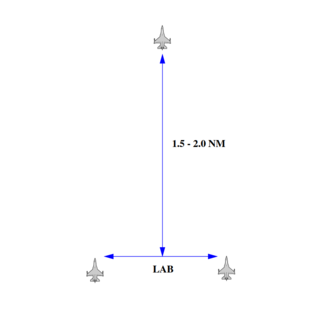
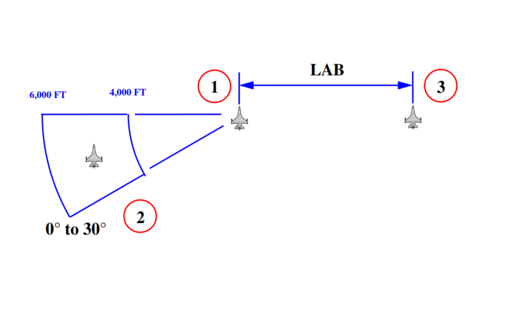
Line Abreast formation is a position 0 to 20 degrees aft; 4,000 to 12,000 feet (0.50 to 2.00 NM) spacing; with altitude separation. (See Below Figure, Two-Ship Line Abreast Formation.) At low altitude, the wingman should fly no lower than lead.
- Wingmen will fly from 6,000 to 9,000 (1.00 to 1.50 NM) feet and strive for the 0-degree line, unless further defined by the flight lead. The 6,000 to 9,000 (1.00 to 1.50 NM) feet position provides optimum visual and firepower mutual support for threats from the beam and 6 o'clock positions.
- The flight lead may tailor the parameters of this formation to meet particular situations or requirements. For example, in poor visibility conditions at low altitude, the wingman may be briefed to fly 4,000 to 6,000 (0.50 to 1.00 NM) feet lateral spacing. For certain A/A scenarios, the briefed lateral spacing may be 9,000 to 12,000 (1.50 to 2.00 NM) feet to enhance 6 o'clock visual coverage while complicating the enemy's visual acquisition of all aircraft in the formation. Wing- men need to maintain a formation position, that allows performance of other responsibilities and does not require them to concentrate 100 percent of their attention on flying formation.
- Each pilot must be in a position to detect an adversary converting on the wingman's stern prior to that adversary reaching firing parameters. Against an all-aspect, all-weather adversary this may not be possible. F-16 rearward visibility field of view (FOV) is not a limiting factor, as it is in most other aircraft.
- This formation allows element members to be in position to quickly bring ordnance to bear when a threat is detected. A vertical stack of 2,000 to 5,000 feet, when applicable, minimizes the chance of simultaneous detection by a bandit.
Brevity Call
- Initiate formations - Lead: Flight, go Line Abreast Left/Right.
- Wingman: 2.
- In position - Wingman: 2, In position.
Beow is Two-Ship LAB Right Rear View
Fighting Wing (Spread)
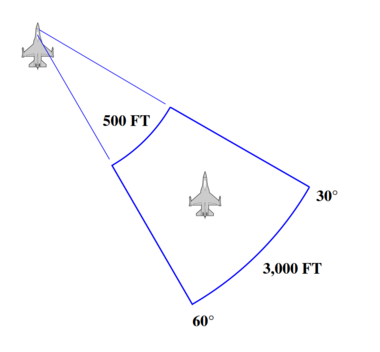
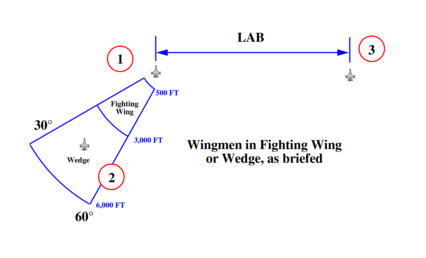
This formation, flown as a two-ship, gives the wingman a maneuvering cone from 30 to 60 degrees aft of line abreast and lateral spacing between 500 to 3,000 feet (0.01 to 0.50 NM). Number Two maneuvers off lead and uses cutoff as necessary to maintain position. This formation is employed in situations where maximum maneuvering potential is desired. Arenas for use include holding in a tactical environment or maneuvering around obstacles or clouds. (See Below Figure, Fighting Wing Formation.)
Advantages:
- The formation allows the element to maintain flight integrity under marginal weather conditions or in rough terrain.
- Allows for cockpit heads-down time for administrative functions when in a low-threat arena where hard maneuvering is not required.
Disadvantages:
- Poor to nonexistent 6 o'clock coverage.
- Easy detection of formation by single threat.
Brevity Call
- Initiate formations - Lead: Flight, go Fighting Wing(Spread) Left/Right.
- Wingman: 2.
- In position - Wingman: 2, In position.
Two-Ship Wedge
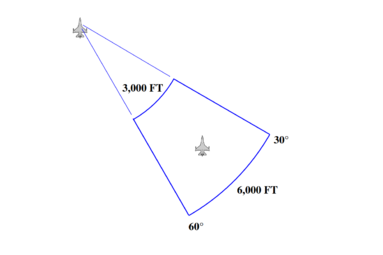
Wedge positions the wingman 30 to 60 degrees aft of the leader's 3/9 line, 3,000 to 6,000 feet back. The flight lead may extend the formation spacing out to 12,000 (2.00 NM) feet to meet particular situations or requirements. (See Below Figure, Two-Ship Wedge.)
- The advantages of wedge are that the leader is well protected in the 6 o'clock area and is free to maneuver aggressively. The wingman may switch sides as required during turns. The wingman may also switch sides as required to avoid terrain, obstacles, or weather but must return to the original side unless cleared by the leader.
- The most significant disadvantage of the wedge is that it provides little to no 6 o'clock protection for the wingman. Lead changes, if required, are difficult to execute.
Brevity Call
- Initiate formations - Lead: Flight, go Wedge Left/Right.
- Wingman: 2.
- In position - Wingman: 2, In position.
Three-Ship Formations
There may be occasions when a priority mission requires maximum available aircraft and a three-ship is the only alternative. Mutual support requirements to ensure survivability and recovery are paramount; therefore, a three-ship contingency should be briefed on all four-ship missions. On these occasions, the following three-ship formation discussion is applicable.
Vic
Lead flies 9,000 to 12,000 feet (1.50 to 2.00 NM) in front of the trailing element. The lead aircraft maneuvers as desired. The trailing element uses line abreast maneuvering to follow. (See Below Figure, Three-Ship Vic Formation.)
Brevity Call
- Initiate formations - Lead: Flight, go Vic.
- Wingman: 2.
- Element Lead: 3.
- In position - Wingman: 2, In position.
- In position - Element Lead: 3, In position.
Fluid Three
This is the same as Fluid Four with one aircraft missing. If the three-ship is caused by one aircraft falling out from a briefed four-ship, the following position changes should be followed: if lead falls out, Number Three assumes lead and Number Two moves to line abreast; if Number Three falls out, Number Four moves up to line abreast; if Number Two or Number Four fall out, there are no changes. (See Below Figure, Three-Ship Fluid Three.)
Brevity Call
- Initiate formations - Lead: Flight, go Fluid.
- Wingman: 2.
- Element Lead: 3.
- In position - Wingman: 2, In position.
- In position - Element Lead: 3, In position.
Spread Three
This is the same as Spread Four with one aircraft missing. Roles and responsibilities caused by fall out from a four-ship are the same as Fluid Three. (See Below Figure, Three-Ship Spread Three.)
Brevity Call
- Initiate formations - Lead: Flight, go Spread.
- Wingman: 2.
- Element Lead: 3.
- In position - Wingman: 2, In position.
- In position - Element Lead: 3, In position.
Viper Three
This is the same as Viper Four with one aircraft missing. Roles and responsibilities caused by fall out from a four-ship are the same as Fluid Three. (See Below Figure, Three-Ship Viper Three.)
Brevity Call
- Initiate formations - Lead: Flight, go Viper.
- Wingman: 2.
- Element Lead: 3.
- In position - Wingman: 2, In position.
- In position - Element Lead: 3, In position.
Four-Ship Formations
The four-ship is under the control of one flight lead and is employed as a single entity until such time as it is forced to separate into two elements. At no time should an element sacrifice element integrity attempting to maintain the four-ship formation. Each two-ship element should have its own radar and visual plan so that no changes will be required if the four-ship is split into two-ships.
Box/Offset Box
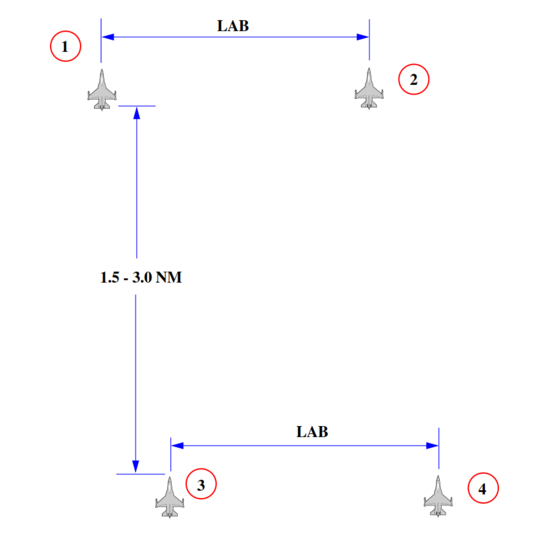
In Box formation, elements use the line abreast maneuvering and look-out principles. The trailing element takes 1.50 to 3,00 NM separation, depending on terrain and weather. The objective of the spacing is to give separation to avoid easy visual detection of the whole formation, while positioning the rear element in a good position to immediately engage an enemy converting on the lead element. Because the F-16 is difficult to see from a direct trail position, a slight offset will facilitate keeping sight of the lead element. Use of A/A tactical air navigation (TACAN) between the elements, and the radar in the rear element, will help keep the proper spacing. Element leaders initiate formation maneuvers. Number Three maneuvers to achieve pre-briefed spacing on the lead element (based on threat, mission, and weather). Flight leads may modify wingmen position to Wedge or Fighting Wing if desired. (See Below Figure, Four-Ship Offset Box.)
NOTE: In an ATC environment, if standard formation is required, the trailing element should fly closer than 1 NM and wingmen from 4,000 to 6,000 (0.50 to 1.00 NM) feet.
Advantages:
- The formation provides excellent mutual support and lookout.
- The rear element is positioned to engage an adversary making a stern conversion on the lead element.
- It is difficult to visually acquire the entire flight.
- Element spacing for an attack is built into the formation.
Disadvantages:
- The formation is difficult to fly in poor visibility and rugged terrain.
- Depending on position, the trailing element may be momentarily mistaken as a threat, especially if staggered too much off to one side.
Brevity Call
- Initiate formations - Lead: Flight, go Box/Offset Box.
- Wingman: 2.
- Element Lead: 3.
- Element Wingman: 4.
- In position - Wingman: 2, In position.
- In position - Element Lead: 3, In position.
- In position - Element Wingman: 4, In position.
Fluid Four
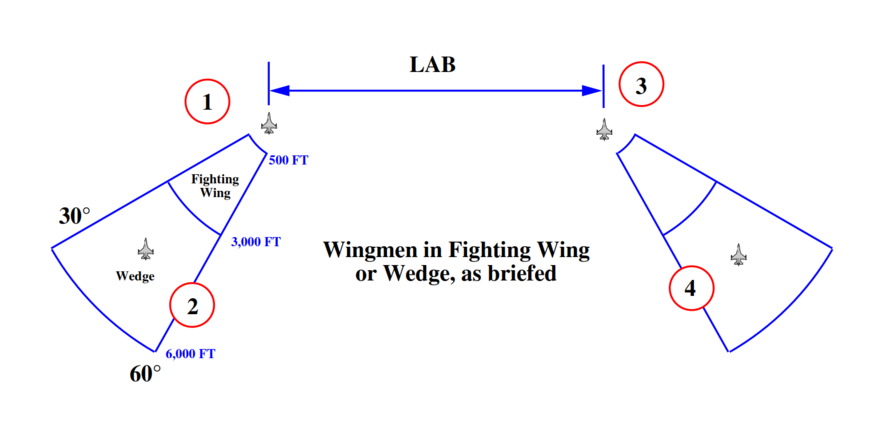
Element leads fly line abreast, with wingmen in Fighting Wing or Wedge (as briefed) on the outside of the formation. Number Three maneuvers off Number One. Num- ber Two and Number Four maneuver off their element leaders to maintain the outside of the formation. Element leads are responsible for deconfliction of elements when crossing the opposing element's 6 o'clock. At medium altitude, wingmen should stack away from the other element when turning. (See Below Figure, Fluid Four Formation.)
Advantages:
- Inexperienced wingmen are kept close for ease of maneuvering.
- Four-ship maneuverability is good.
- Good NVG formation when wingmen fly the Wedge position.
- Formation provides concentration of force.
- Easily converts to three-ship when one aircraft falls out.
Disadvantages:
- Adversary can acquire all four aircraft.
- Defensive maneuvering produces deconfliction challenges due to the proximity of aircraft.
- Cumbersome to maneuver at low altitude in rough terrain.
Brevity Call
- Initiate formations - Lead: Flight, go Fluid.
- Wingman: 2.
- Element Lead: 3.
- Element Wingman: 4.
- In position - Wingman: 2, In position.
- In position - Element Lead: 3, In position.
- In position - Element Wingman: 4, In position.
Spread Four
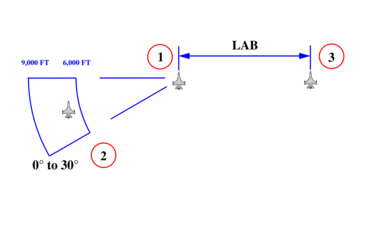
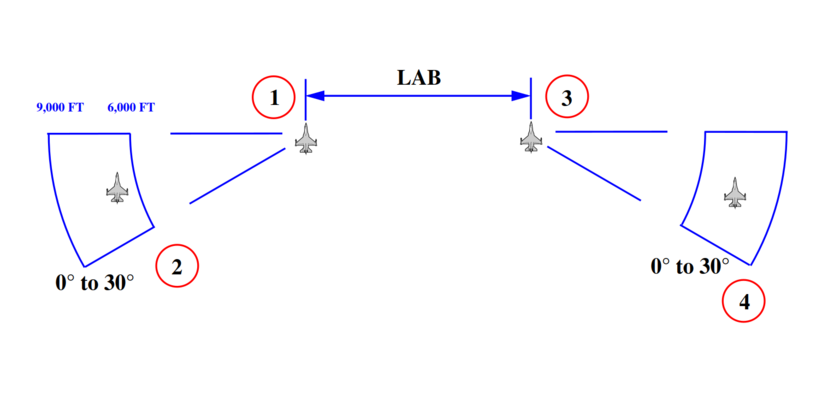
Element leads maintain line abreast, wingmen position themselves 0 to 30 degrees back from their element leads and 6,000 to 9,000 (1.00 to 1.50 NM) feet spread. Each element uses fluid maneuvering. Number Three flies off Number One (similar to Fluid Four). The elements are not always required to be line abreast. On some occasions they may be briefly in trail. (See Below Figure, Spread Four Formation.)
Advantages:
- Spread Four formation makes it difficult for an adversary to visually acquire the entire flight at once.
- Firepower is maximized for BVR weapons employment.
Disadvantages:
- Maneuvering is difficult if the line abreast position is maintained.
- Very difficult for wingmen to fly at low altitude.
Brevity Call
- Initiate formations - Lead: Flight, go Fluid.
- Wingman: 2.
- Element Lead: 3.
- Element Wingman: 4.
- In position - Wingman: 2, In position.
- In position - Element Lead: 3, In position.
- In position - Element Wingman: 4, In position.
Viper Four (Res Cell)
Element leads maintain line abreast, wingmen position themselves 0 to 30 degrees back from their element leads and 4,000 to 6,000 (0.50 to 1.00 NM) feet spread; this is the same as Spread Four, but wingmen fly a tighter position. (See Below Figure, Viper Four Formation.)
Brevity Call
- Initiate formations - Lead: Flight, go Viper(Res Cell).
- Wingman: 2.
- Element Lead: 3.
- Element Wingman: 4.
- In position - Wingman: 2, In position.
- In position - Element Lead: 3, In position.
- In position - Element Wingman: 4, In position.
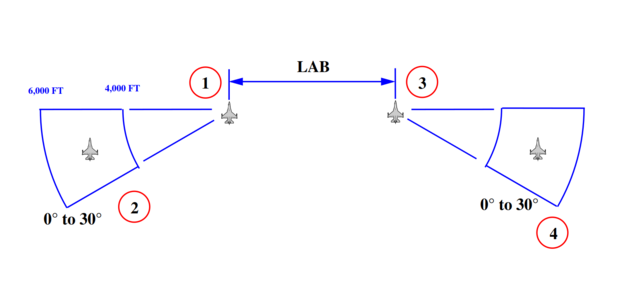
Four-Ship Line Abreast (4-Ship LAB)
The LAB formation is flown as a 4-ship next to each other with a separation of 1.00 to 2.00 NM between each aircraft. Ideally the flight is on the 0° line. The cone to maneuver can be extended to 20°. This formation is quite challenging for the whole flight and requires staying constantly visual to the aircraft next to you. A good flight lead always maintain speed and heading if possible to so the wingman can maintain the formation easier. The flight can also be on the left side of the flight lead depending on the briefing or tactical situation.
Brevity Call
- Initiate formations - Lead: Flight, go Line Abreast.
- Wingman: 2.
- Element Lead: 3.
- Element Wingman: 4.
- In position - Wingman: 2, In position.
- In position - Element Lead: 3, In position.
- In position - Element Wingman: 4, In position.
Four-Ship Wedge
Wedge is defined as the wingman positioned from 30° to 60° aft of the leader's 3/9 line with a spacing of 4,000 to 6,000 feet (0.50 to 1.00 NM) and at the same altitude level. The advantages of the “Wedge” formation for each element are that the leader is well protected in the 6 o’clock area and is free to maneuver aggressively. The wingman can switch sides for turns or to avoid any obstacle. The tactical advantage is that flights, especially with an Air-to-Air task (Sweep, etc.), can establish much quicker 4-ship tactics like a grinder, a CAP or a bracket because there is already distance between elements. The wingman may switch sides as required during turns.
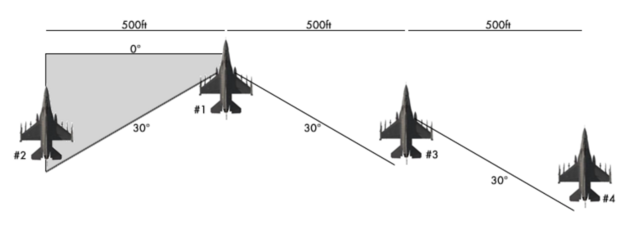
Route
The “Route” formation is a loose formation which corresponds to an enlarged “Fingertip” formation. It allows to increase flight maneuverability as well as to let the flight control instruments, airspace and do other tasks in the cockpit in more safe conditions. The distance between each aircraft is about 500ft (0.01 NM). The flight can operate at the same altitude or element can be 200ft higher/lower. The cone to maneuver (grey area in the picture) is the 30° and the 0° line.
Brevity Call
- Initiate formations - Lead: Flight, go Route Left/Right.
- Wingman: 2.
- Element Lead: 3.
- Element Wingman: 4.
- In position - Wingman: 2, In position.
- In position - Element Lead: 3, In position.
- In position - Element Wingman: 4, In position.
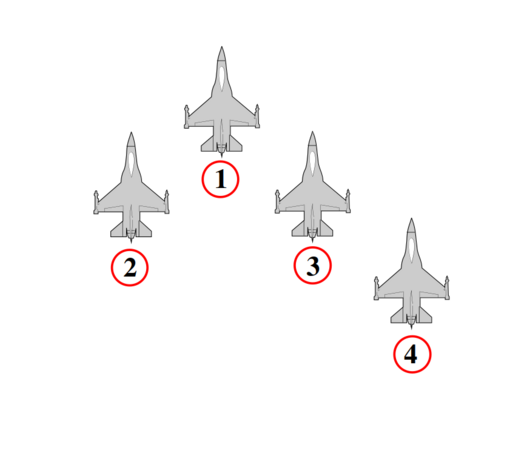
Arrowhead
The “Arrowhead” formation is a mixture of a “Wedge” formation (first element) and LAB formation (second element). The second element is in 2.00 NM trail.
Diamond
This formation can be flown tight or loose and is mostly used for airshows (no tactical advantage).
2-/3-/4-Ship Formations
Fingertip
The “Fingertip” formation is a closely flown standard formation. It requires that the wingman is constantly visually fixated on his lead.
Brevity Call
- Initiate formations - Lead: Flight, go Fingertip Left/Right.
- Wingman: 2.
- Element Lead: 3.
- Element Wingman: 4.
- In position - Wingman: 2, In position.
- In position - Element Lead: 3, In position.
- In position - Element Wingman: 4, In position.
Finger Four
Same as Fingertip but spaced wider, loose spacing up to 1,500 to 2,000 feet (0.25 to 0.30 NM).
Brevity Call
- Initiate formations - Lead: Flight, go Finger Left/Right.
- Wingman: 2.
- Element Lead: 3.
- Element Wingman: 4.
- In position - Wingman: 2, In position.
- In position - Element Lead: 3, In position.
- In position - Element Wingman: 4, In position.
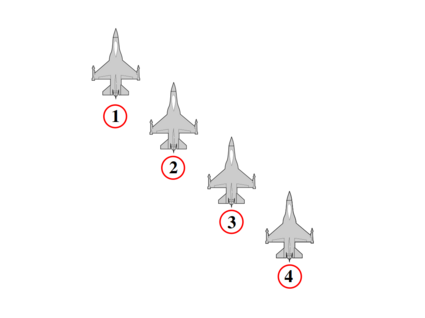
Echelon
The “Echelon” formation (left / right) is the standard formation for Overhead Approaches and Tanker Operations.
“Echelon” formations are normally flown very tight (similar to fingertip).The wing tip rail / wingtip missile aligned with the canopy frame (= 45° canopy cue) serves as a reference for close formations. A decent stacking from high (#1) to low (#4) is practical.
Brevity Call
- Initiate formations - Lead: Flight, go Echelon Left/Right.
- Wingman: 2.
- Element Lead: 3.
- Element Wingman: 4.
- In position - Wingman: 2, In position.
- In position - Element Lead: 3, In position.
- In position - Element Wingman: 4, In position.
Trail
Brevity Call
- Initiate formations - Lead: Flight, go Trail Left/Right.
- Wingman: 2.
- Element Lead: 3.
- Element Wingman: 4.
- In position - Wingman: 2, In position.
- In position - Element Lead: 3, In position.
- In position - Element Wingman: 4, In position.
Ladder
Brevity Call
- Initiate formations - Lead: Flight, go Ladder.
- Wingman: 2.
- Element Lead: 3.
- Element Wingman: 4.
- In position - Wingman: 2, In position.
- In position - Element Lead: 3, In position.
- In position - Element Wingman: 4, In position.
Stack
Brevity Call
- Initiate formations - Lead: Flight, go Stack.
- Wingman: 2.
- Element Lead: 3.
- Element Wingman: 4.
- In position - Wingman: 2, In position.
- In position - Element Lead: 3, In position.
- In position - Element Wingman: 4, In position.
Manoeuvres
Turns may be communicated with either the radio or visual signals. Line Abreast formations compensate for inherent maneuvering problems with specialized pre-briefed procedures. These include the type of turns to be made, the parameters at which these turns will be made, and the method by which these turns will be initiated. The turns consist of 45- to 90-degree delayed turns, in-place turns, cross turns, weaves, and check turns. The parameters for the turns are briefed by each flight leader and usually consist of the speed, “G,” and the power required in the turn. The method of turn initiation is generally by radio call, wing flash, or check turn. There are two ways to initiated the manoeuvers, via Communication or via Signal.
Maneuvering With Unrestricted Communication
When the radios are available, some flight leads will use them. Tactical turns will be initiated by the flight lead. The preparatory command for a turn is flight call sign and the command of execution is the type turn called (e.g., “VIPER 1, 90 RIGHT”). Delayed turn types are assumed, unless overridden in flight (e.g., “VIPER 1, HOOK RIGHT”, “VIPER 1 IN PLACE 90 LEFT”).
Radio Silent Maneuvering
Add Later, Not important since BMS have no hand signal modeled.
Tactical Turns
Turns may be communicated with either the radio or visual signals. Line Abreast formations compensate for inherent maneuvering problems with specialized pre-briefed procedures. These include the type of turns to be made, the parameters at which these turns will be made, and the method by which these turns will be initiated. The turns consist of 45- to 90-degree delayed turns, in-place turns, cross turns, weaves, and check turns. The parameters for the turns are briefed by each flight leader and usually consist of the speed, “G,” and the power required in the turn. The method of turn initiation is generally by radio call, wing flash, or check turn.
Normally turn at Mil power and use ~2.0 - 3.0 G to maintain airspeed.
Check Turns
Check turns are just gentle turns with no more than 30 degrees of bank and can be used for anything from a minor heading adjustment to a full 360 if needed.
Brevity Call
- Initiate Maneuver - Lead: Flight, 120 Left (320) (Now). 320 = (Turn to heading 320° is optional, make the instruction more clearer). Now = (Execute turn now, without "Now" mean execute when Lead start maneuvering and turn)
Two-Ship Tactical Turns
Delayed 45° Turn
Brevity Call
- Left
- Initiate Maneuver - Lead: Flight, 45 Left (320) (Now). 320 = (Turn to heading 320° is optional, make the instruction more clearer). Now = (Execute turn now, without "Now" mean execute when Lead start maneuvering and turn)
- Right
- Initiate Maneuver - Lead: Flight, 45 Right (320) (Now). 320 = (Turn to heading 320° is optional, make the instruction more clearer), Now = (Wingmen execute turn now, without "Now" mean turn when Wingmen ready)
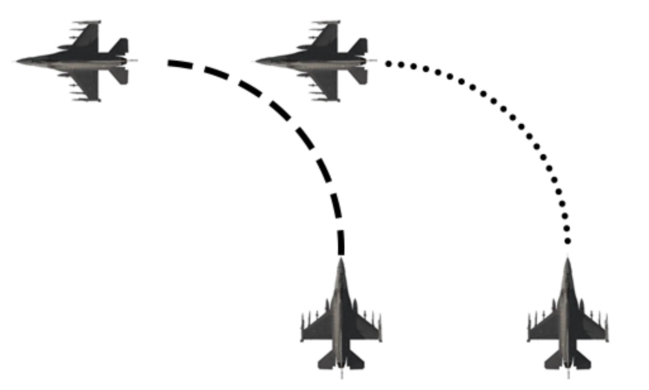
Delayed 90° Turn
Delayed turns are calculated and executed in a fashion that allows a flight currently in “Spread” or “LAB” formation (normally 0,5-1nm distance between aircraft) to maintain the formation and distance after executing a 90° turn. The turn is executed 90° level within a briefed or standardized contract speed. In a delayed turn, the pilot on the outside of the turn always turns first. This may not be the flight- or element lead. As delayed turns require turning in towards aircraft, it is the job of the wingman to deconflict with the element lead to avoid any unsafe conditions. If doing training with two human pilots, it is best practice that the wingman must confirm the turn order from the flight-lead before executing the maneuver to make sure that both flight crews are aware of the following turn.
Brevity Call
- Left
- Initiate Maneuver - Lead: Flight, 45 Left (320) (Now). 320 = (Turn to heading 320° is optional, make the instruction more clearer). Now = (Execute turn now, without "Now" mean execute when Lead start maneuvering and turn)
- Right
- Initiate Maneuver - Lead: Flight, 45 Right (320) (Now). 320 = (Turn to heading 320° is optional, make the instruction more clearer), Now = (Wingmen execute turn now, without "Now" mean turn when Wingmen ready)
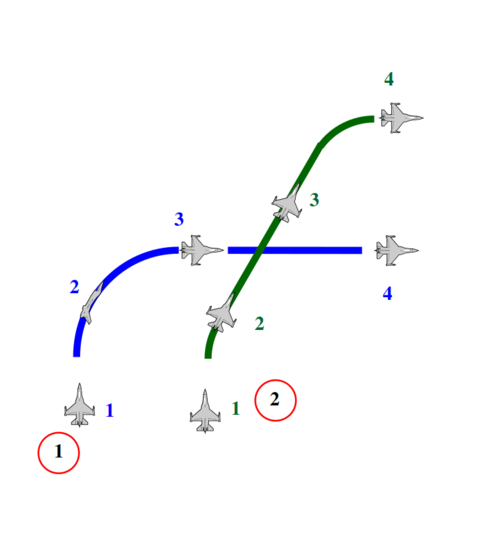
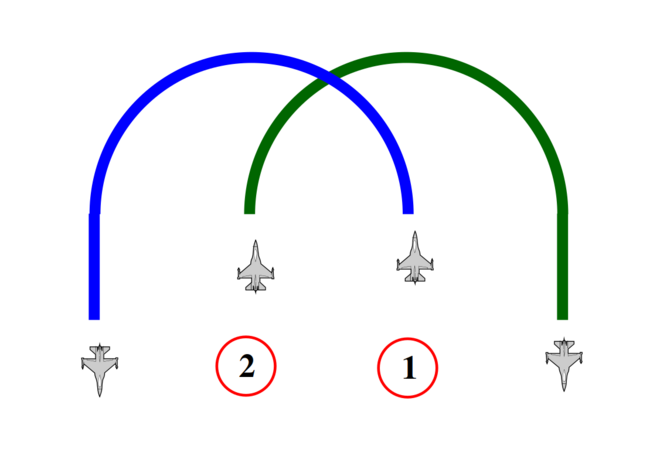
Cross Turn
The Cross turn start in spread/LAB formation. This turn is a synchronized maneuver at level on contract speed. That means, both airplane initiating the turn at the same time. The wingman is always responsible for deconfliction. Be aware: this turn needs an extra portion of visual deconfliction because the aircraft will come very close to each other. This turn is ideal for checking the 6 o’clock of an aircraft.
Brevity Call
- Initiate Maneuver - Lead: Flight, Cross Turn (320) (Now). 320 = (Turn to heading 320° is optional, make the instruction more clearer). Now = (Execute turn now, without "Now" mean execute when Lead start maneuvering and turn)
In Place 90
This turn is a synchronized maneuver at level on contract speed starting in Spread/LAB formation. The wingman is again responsible for deconfliction. This turn is often used for a tactical recovery to homeplate.
Brevity Call
- Initiate Maneuver - Lead: Flight, In Place 90 Left/Right (320) (Now). 320 = (Turn to heading 320° is optional, make the instruction more clearer). Now = (Execute turn now, without "Now" mean execute when Lead start maneuvering and turn)
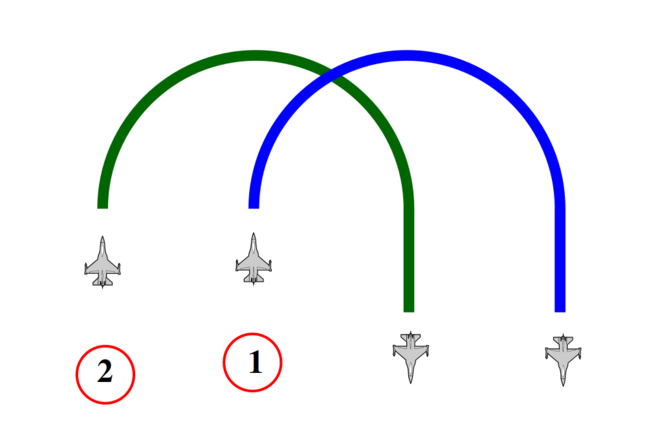
Shackle
A shackle is often used to switch the position of both aircraft quickly in a synchronized manner. If altitude and threat situation allow, the wingman turn below the flight-lead. Again, the wingman is responsible for deconfliction. Especially when executing a cross turn, a shackle is often used after to bring the flight back in a tighter spread/LAB formation.
Brevity Call
- Initiate Maneuver - Lead: Flight, Shackle (Now). Now = (Execute turn now, without "Now" mean execute when Lead start maneuvering and turn)
2-/3-/4-Ship Tactical Turns
Hook Turn
For the Hook turn the flight will again start in spread/LAB formation. This turn is a synchronized maneuver at level on contract speed. That means, both airplane initiating the turn at the same time. The wingman is always responsible for deconfliction.
This turn is ideal for CAPs.
Brevity Call
- Initiate Maneuver - Lead: Flight, Hook Left/Right (320) (Now). 320 = (Turn to heading 320° is optional, make the instruction more clearer). Now = (Execute turn now, without "Now" mean execute when Lead start maneuvering and turn)
Multiple Manoeuvres
(e.g., Flight, Cross Turn with Shackle)
