Formations and Manoeuvres: Difference between revisions
mNo edit summary |
No edit summary |
||
| Line 11: | Line 11: | ||
'''Two-Ship Line Abreast (2-Ship LAB)''' | '''<big>Two-Ship Line Abreast (2-Ship LAB)</big>''' | ||
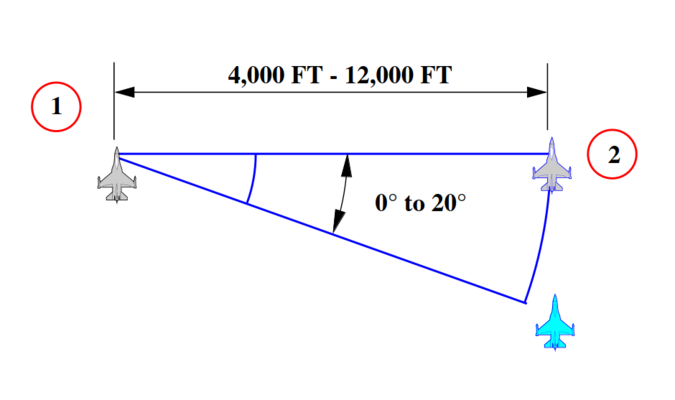
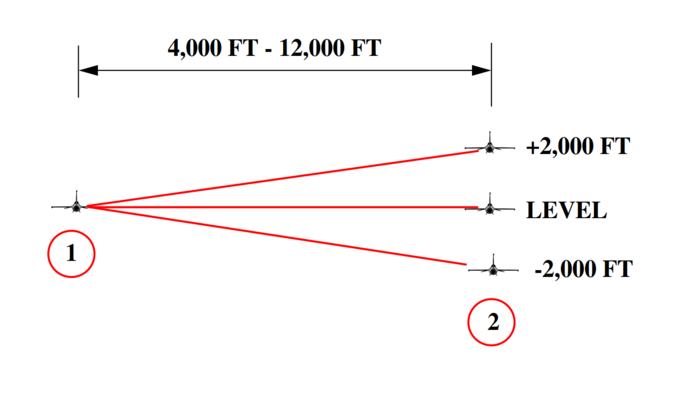
Line Abreast formation is a position 0 to 20 degrees aft; 4,000 to 12,000 feet spacing; with altitude separation. (See Below Figure, Two-Ship Line Abreast Formation.) At low altitude, the wingman should fly no lower than lead. | Line Abreast formation is a position 0 to 20 degrees aft; 4,000 to 12,000 feet spacing; with altitude separation. (See Below Figure, Two-Ship Line Abreast Formation.) At low altitude, the wingman should fly no lower than lead. | ||
| Line 19: | Line 19: | ||
# Each pilot must be in a position to detect an adversary converting on the wingman's stern prior to that adversary reaching firing parameters. Against an all-aspect, all-weather adversary this may not be possible. F-16 rearward visibility field of view (FOV) is not a limiting factor, as it is in most other aircraft. | # Each pilot must be in a position to detect an adversary converting on the wingman's stern prior to that adversary reaching firing parameters. Against an all-aspect, all-weather adversary this may not be possible. F-16 rearward visibility field of view (FOV) is not a limiting factor, as it is in most other aircraft. | ||
# This formation allows element members to be in position to quickly bring ordnance to bear when a threat is detected. A vertical stack of 2,000 to 5,000 feet, when applicable, minimizes the chance of simultaneous detection by a bandit. | # This formation allows element members to be in position to quickly bring ordnance to bear when a threat is detected. A vertical stack of 2,000 to 5,000 feet, when applicable, minimizes the chance of simultaneous detection by a bandit. | ||
'''Brevity Call''' | |||
# Lead: Flight go Line Abreast Left/Right. | |||
# Wingman: 2. | |||
[[File:Two-Ship LAB.png|frameless|675x675px]] | [[File:Two-Ship LAB.png|frameless|675x675px]] | ||
| Line 24: | Line 27: | ||
[[File:Two-Ship LAB V.png|frameless|675x675px]] | [[File:Two-Ship LAB V.png|frameless|675x675px]] | ||
'''Fighting Wing''' | '''<big>Fighting Wing</big>''' | ||
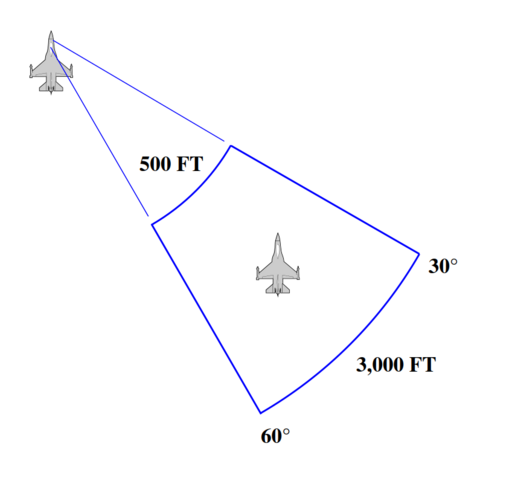
This formation, flown as a two-ship, gives the wingman a maneuvering cone from 30 to 60 degrees aft of line abreast and lateral spacing between 500 to 3,000 feet. Number Two maneuvers off lead and uses cutoff as necessary to maintain position. This formation is employed in situations where maximum maneuvering potential is desired. Arenas for use include holding in a tactical environment or maneuvering around obstacles or clouds. (See Below Figure, Fighting Wing Formation.) | This formation, flown as a two-ship, gives the wingman a maneuvering cone from 30 to 60 degrees aft of line abreast and lateral spacing between 500 to 3,000 feet. Number Two maneuvers off lead and uses cutoff as necessary to maintain position. This formation is employed in situations where maximum maneuvering potential is desired. Arenas for use include holding in a tactical environment or maneuvering around obstacles or clouds. (See Below Figure, Fighting Wing Formation.) | ||
| Line 37: | Line 40: | ||
* Poor to nonexistent 6 o'clock coverage. | * Poor to nonexistent 6 o'clock coverage. | ||
* Easy detection of formation by single threat. | * Easy detection of formation by single threat. | ||
'''Brevity Call''' | |||
# Lead: Flight go Fighting Wing Left/Right. | |||
# Wingman: 2. | |||
[[File:Fighting Wing.png|frameless|515x515px]] | [[File:Fighting Wing.png|frameless|515x515px]] | ||
'''Two-Ship Wedge''' | '''<big>Two-Ship Wedge</big>''' | ||
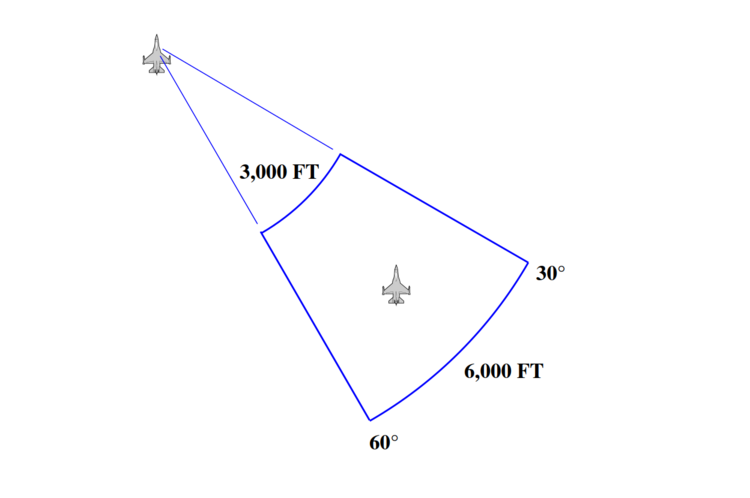
Wedge positions the wingman 30 to 60 degrees aft of the leader's 3/9 line, 3,000 to 6,000 feet back. The flight lead may extend the formation spacing out to 12,000 feet to meet particular situations or requirements. (See Below Figure, Two-Ship Wedge.) | Wedge positions the wingman 30 to 60 degrees aft of the leader's 3/9 line, 3,000 to 6,000 feet back. The flight lead may extend the formation spacing out to 12,000 feet to meet particular situations or requirements. (See Below Figure, Two-Ship Wedge.) | ||
| Line 46: | Line 52: | ||
# The advantages of wedge are that the leader is well protected in the 6 o'clock area and is free to maneuver aggressively. The wingman may switch sides as required during turns. The wingman may also switch sides as required to avoid terrain, obstacles, or weather but must return to the original side unless cleared by the leader. | # The advantages of wedge are that the leader is well protected in the 6 o'clock area and is free to maneuver aggressively. The wingman may switch sides as required during turns. The wingman may also switch sides as required to avoid terrain, obstacles, or weather but must return to the original side unless cleared by the leader. | ||
# The most significant disadvantage of the wedge is that it provides little to no 6 o'clock protection for the wingman. Lead changes, if required, are difficult to execute. | # The most significant disadvantage of the wedge is that it provides little to no 6 o'clock protection for the wingman. Lead changes, if required, are difficult to execute. | ||
'''Brevity Call''' | |||
# Lead: Flight go Wedge Left/Right. | |||
# Wingman: 2. | |||
[[File:Two-Ship Wedge.png|frameless|750x750px]] | [[File:Two-Ship Wedge.png|frameless|750x750px]] | ||
| Line 52: | Line 61: | ||
There may be occasions when a priority mission requires maximum available aircraft and a three-ship is the only alternative. Mutual support requirements to ensure survivability and recovery are paramount; therefore, a three-ship contingency should be briefed on all four-ship missions. On these occasions, the following three-ship formation discussion is applicable. | There may be occasions when a priority mission requires maximum available aircraft and a three-ship is the only alternative. Mutual support requirements to ensure survivability and recovery are paramount; therefore, a three-ship contingency should be briefed on all four-ship missions. On these occasions, the following three-ship formation discussion is applicable. | ||
'''Vic''' | |||
'''<big>Vic</big>''' | |||
Lead flies 1.5 to 2 NM in front of the trailing element. The lead aircraft maneuvers as desired. The trailing element uses line abreast maneuvering to follow. (See Below Figure, Three-Ship Vic Formation.) | Lead flies 1.5 to 2 NM in front of the trailing element. The lead aircraft maneuvers as desired. The trailing element uses line abreast maneuvering to follow. (See Below Figure, Three-Ship Vic Formation.) | ||
'''Brevity Call''' | |||
# Lead: Flight go Vic. | |||
# Wingman: 2. | |||
# Element Lead: 3. | |||
[[File:Three-Ship Vic.png|frameless|620x620px]] | [[File:Three-Ship Vic.png|frameless|620x620px]] | ||
'''Fluid Three''' | '''<big>Fluid Three</big>''' | ||
This is the same as Fluid Four with one aircraft missing. If the three-ship is caused by one aircraft falling out from a briefed four-ship, the following position changes should be followed: if lead falls out, Number Three assumes lead and Number Two moves to line abreast; if Number Three falls out, Number Four moves up to line abreast; if Number Two or Number Four fall out, there are no changes. (See Below Figure, Three-Ship Fluid Three.) | This is the same as Fluid Four with one aircraft missing. If the three-ship is caused by one aircraft falling out from a briefed four-ship, the following position changes should be followed: if lead falls out, Number Three assumes lead and Number Two moves to line abreast; if Number Three falls out, Number Four moves up to line abreast; if Number Two or Number Four fall out, there are no changes. (See Below Figure, Three-Ship Fluid Three.) | ||
'''Brevity Call''' | |||
# Lead: Flight go Fluid. | |||
# Wingman: 2. | |||
# Element Lead: 3. | |||
[[File:Three-Ship Fluid Three.png|frameless|690x690px]] | [[File:Three-Ship Fluid Three.png|frameless|690x690px]] | ||
'''Spread Three''' | '''<big>Spread Three</big>''' | ||
This is the same as Spread Four with one aircraft missing. Roles and responsibilities caused by fall out from a four-ship are the same as Fluid Three. (See Below Figure, Three-Ship Spread Three.) | This is the same as Spread Four with one aircraft missing. Roles and responsibilities caused by fall out from a four-ship are the same as Fluid Three. (See Below Figure, Three-Ship Spread Three.) | ||
'''Brevity Call''' | |||
# Lead: Flight go Spread. | |||
# Wingman: 2. | |||
# Element Lead: 3. | |||
[[File:Three-Ship Spread Three.png|frameless|690x690px]] | [[File:Three-Ship Spread Three.png|frameless|690x690px]] | ||
'''Viper Three''' | '''<big>Viper Three</big>''' | ||
This is the same as Viper Four with one aircraft missing. Roles and responsibilities caused by fall out from a four-ship are the same as Fluid Three. (See Below Figure, Three-Ship Viper Three.) | This is the same as Viper Four with one aircraft missing. Roles and responsibilities caused by fall out from a four-ship are the same as Fluid Three. (See Below Figure, Three-Ship Viper Three.) | ||
'''Brevity Call''' | |||
# Lead: Flight go Viper. | |||
# Wingman: 2. | |||
# Element Lead: 3. | |||
[[File:Three-Ship Viper Three.png|frameless|689x689px]] | [[File:Three-Ship Viper Three.png|frameless|689x689px]] | ||
| Line 79: | Line 109: | ||
The four-ship is under the control of one flight lead and is employed as a single entity until such time as it is forced to separate into two elements. At no time should an element sacrifice element integrity attempting to maintain the four-ship formation. Each two-ship element should have its own radar and visual plan so that no changes will be required if the four-ship is split into two-ships. | The four-ship is under the control of one flight lead and is employed as a single entity until such time as it is forced to separate into two elements. At no time should an element sacrifice element integrity attempting to maintain the four-ship formation. Each two-ship element should have its own radar and visual plan so that no changes will be required if the four-ship is split into two-ships. | ||
'''Box/Offset Box''' | |||
'''<big>Box/Offset Box</big>''' | |||
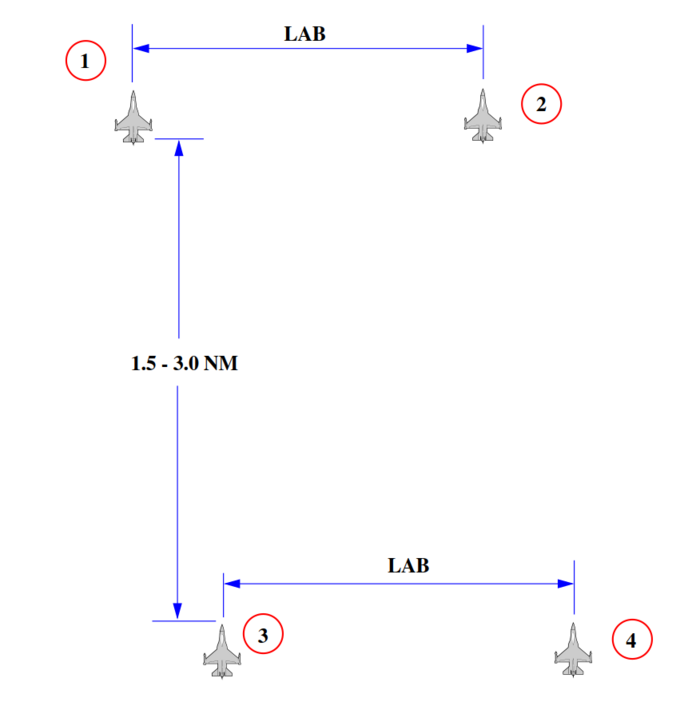
In Box formation, elements use the line abreast maneuvering and look-out principles. The trailing element takes 1.5 to 3 NM separation, depending on terrain and weather. The objective of the spacing is to give separation to avoid easy visual detection of the whole formation, while positioning the rear element in a good position to immediately engage an enemy converting on the lead element. Because the F-16 is difficult to see from a direct trail position, a slight offset will facilitate keeping sight of the lead element. Use of A/A tactical air navigation (TACAN) between the elements, and the radar in the rear element, will help keep the proper spacing. Element leaders initiate formation maneuvers. Number Three maneuvers to achieve pre-briefed spacing on the lead element (based on threat, mission, and weather). Flight leads may modify wingmen position to Wedge or Fighting Wing if desired. (See Below Figure, Four-Ship Offset Box.) | In Box formation, elements use the line abreast maneuvering and look-out principles. The trailing element takes 1.5 to 3 NM separation, depending on terrain and weather. The objective of the spacing is to give separation to avoid easy visual detection of the whole formation, while positioning the rear element in a good position to immediately engage an enemy converting on the lead element. Because the F-16 is difficult to see from a direct trail position, a slight offset will facilitate keeping sight of the lead element. Use of A/A tactical air navigation (TACAN) between the elements, and the radar in the rear element, will help keep the proper spacing. Element leaders initiate formation maneuvers. Number Three maneuvers to achieve pre-briefed spacing on the lead element (based on threat, mission, and weather). Flight leads may modify wingmen position to Wedge or Fighting Wing if desired. (See Below Figure, Four-Ship Offset Box.) | ||
| Line 94: | Line 125: | ||
* The formation is difficult to fly in poor visibility and rugged terrain. | * The formation is difficult to fly in poor visibility and rugged terrain. | ||
* Depending on position, the trailing element may be momentarily mistaken as a threat, especially if staggered too much off to one side. | * Depending on position, the trailing element may be momentarily mistaken as a threat, especially if staggered too much off to one side. | ||
'''Brevity Call''' | |||
# Lead: Flight go Box/Offset Box. | |||
# Wingman: 2. | |||
# Element Lead: 3. | |||
# Element Wingman: 4. | |||
[[File:Four-Ship Offset Box.png|frameless|706x706px]] | [[File:Four-Ship Offset Box.png|frameless|706x706px]] | ||
'''Fluid Four''' | '''<big>Fluid Four</big>''' | ||
Element leads fly line abreast, with wingmen in Fighting Wing or Wedge (as briefed) on the outside of the formation. Number Three maneuvers off Number One. Num- ber Two and Number Four maneuver off their element leaders to maintain the outside of the formation. Element leads are responsible for deconfliction of elements when crossing the opposing element's 6 o'clock. At medium altitude, wingmen should stack away from the other element when turning. (See Below Figure, Fluid Four Formation.) | Element leads fly line abreast, with wingmen in Fighting Wing or Wedge (as briefed) on the outside of the formation. Number Three maneuvers off Number One. Num- ber Two and Number Four maneuver off their element leaders to maintain the outside of the formation. Element leads are responsible for deconfliction of elements when crossing the opposing element's 6 o'clock. At medium altitude, wingmen should stack away from the other element when turning. (See Below Figure, Fluid Four Formation.) | ||
| Line 113: | Line 149: | ||
* Defensive maneuvering produces deconfliction challenges due to the proximity of aircraft. | * Defensive maneuvering produces deconfliction challenges due to the proximity of aircraft. | ||
* Cumbersome to maneuver at low altitude in rough terrain. | * Cumbersome to maneuver at low altitude in rough terrain. | ||
'''Brevity Call''' | |||
# Lead: Flight go Fluid. | |||
# Wingman: 2. | |||
# Element Lead: 3. | |||
# Element Wingman: 4. | |||
[[File:Four-Ship Fluid Four.png|frameless|839x839px]] | [[File:Four-Ship Fluid Four.png|frameless|839x839px]] | ||
'''Spread Four''' | '''<big>Spread Four</big>''' | ||
Element leads maintain line abreast, wingmen position themselves 0 to 30 degrees back from their element leads and 6,000 to 9,000 feet spread. Each element uses fluid maneuvering. Number Three flies off Number One (similar to Fluid Four). The elements are not always required to be line abreast. On some occasions they may be briefly in trail. (See Below Figure, Spread Four Formation.) | Element leads maintain line abreast, wingmen position themselves 0 to 30 degrees back from their element leads and 6,000 to 9,000 feet spread. Each element uses fluid maneuvering. Number Three flies off Number One (similar to Fluid Four). The elements are not always required to be line abreast. On some occasions they may be briefly in trail. (See Below Figure, Spread Four Formation.) | ||
| Line 128: | Line 169: | ||
* Maneuvering is difficult if the line abreast position is maintained. | * Maneuvering is difficult if the line abreast position is maintained. | ||
* Very difficult for wingmen to fly at low altitude. | * Very difficult for wingmen to fly at low altitude. | ||
'''Brevity Call''' | |||
# Lead: Flight go Fluid. | |||
# Wingman: 2. | |||
# Element Lead: 3. | |||
# Element Wingman: 4. | |||
[[File:Four-Ship Spread Four.png|frameless|840x840px]] | [[File:Four-Ship Spread Four.png|frameless|840x840px]] | ||
'''Viper Four''' | '''<big>Viper Four</big>''' | ||
Element leads maintain line abreast, wingmen position themselves 0 to 30 degrees back from their element leads and 4,000 to 6,000 feet spread; this is the same as Spread Four, but wingmen fly a tighter position. (See Below Figure, Viper Four Formation.) | Element leads maintain line abreast, wingmen position themselves 0 to 30 degrees back from their element leads and 4,000 to 6,000 feet spread; this is the same as Spread Four, but wingmen fly a tighter position. (See Below Figure, Viper Four Formation.) | ||
'''Brevity Call''' | |||
# Lead: Flight go Viper. | |||
# Wingman: 2. | |||
# Element Lead: 3. | |||
# Element Wingman: 4. | |||
[[File:Four-Ship Viper Four.png|frameless|840x840px]] | [[File:Four-Ship Viper Four.png|frameless|840x840px]] | ||
'''Four-Ship Line Abreast (4-Ship LAB)''' | '''<big>Four-Ship Line Abreast (4-Ship LAB)</big>''' | ||
'''Brevity Call''' | |||
# Lead: Flight go Line Abreast. | |||
# Wingman: 2. | |||
# Element Lead: 3. | |||
# Element Wingman: 4. | |||
[[File:Four-Ship LAB.png|frameless|970x970px]] | [[File:Four-Ship LAB.png|frameless|970x970px]] | ||
Revision as of 07:07, 10 July 2024
Note: Formations or Manoeuvres required to maintain the minimum visual
The purpose of learning formations and manoeuvres is to achieve a quick, safe and coordinated maintaining or changing direction.
- Collision Avoidance: Formations help in maintaining a predictable pattern, reducing the risk of mid-air collisions.
- Mutual Support: Aircraft in formation can provide visual and radar support to each other, enhancing overall situational awareness.
Formations
Two-Ship Formations
Two-Ship Line Abreast (2-Ship LAB)
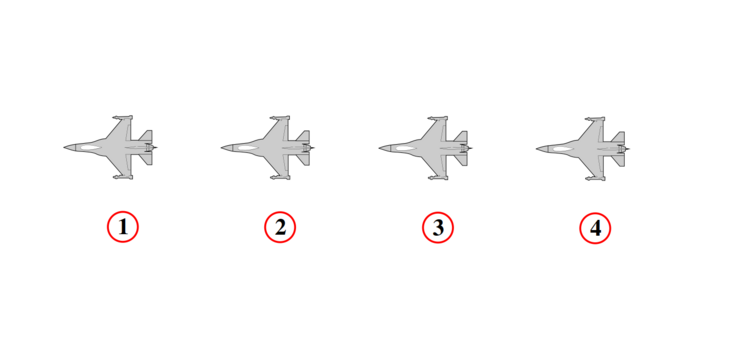
Line Abreast formation is a position 0 to 20 degrees aft; 4,000 to 12,000 feet spacing; with altitude separation. (See Below Figure, Two-Ship Line Abreast Formation.) At low altitude, the wingman should fly no lower than lead.
- Wingmen will fly from 6,000 to 9,000 feet and strive for the 0-degree line, unless further defined by the flight lead. The 6,000 to 9,000 feet position provides optimum visual and firepower mutual support for threats from the beam and 6 o'clock positions.
- The flight lead may tailor the parameters of this formation to meet particular situations or requirements. For example, in poor visibility conditions at low altitude, the wingman may be briefed to fly 4,000 to 6,000 feet lateral spacing. For certain A/A scenarios, the briefed lateral spacing may be 9,000 to 12,000 feet to enhance 6 o'clock visual coverage while complicating the enemy's visual acquisition of all aircraft in the formation. Wing- men need to maintain a formation position, that allows performance of other responsibilities and does not require them to concentrate 100 percent of their attention on flying formation.
- Each pilot must be in a position to detect an adversary converting on the wingman's stern prior to that adversary reaching firing parameters. Against an all-aspect, all-weather adversary this may not be possible. F-16 rearward visibility field of view (FOV) is not a limiting factor, as it is in most other aircraft.
- This formation allows element members to be in position to quickly bring ordnance to bear when a threat is detected. A vertical stack of 2,000 to 5,000 feet, when applicable, minimizes the chance of simultaneous detection by a bandit.
Brevity Call
- Lead: Flight go Line Abreast Left/Right.
- Wingman: 2.
Fighting Wing
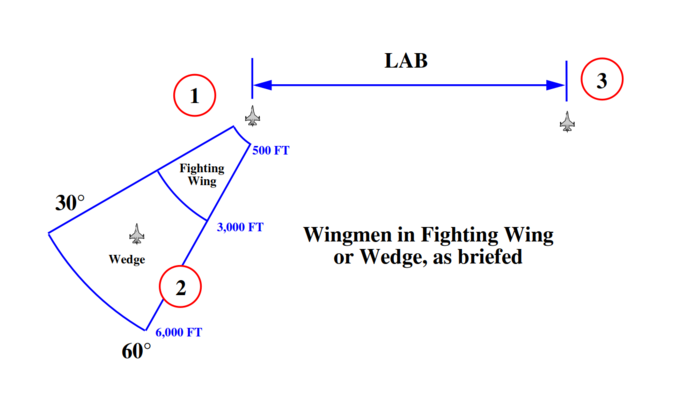
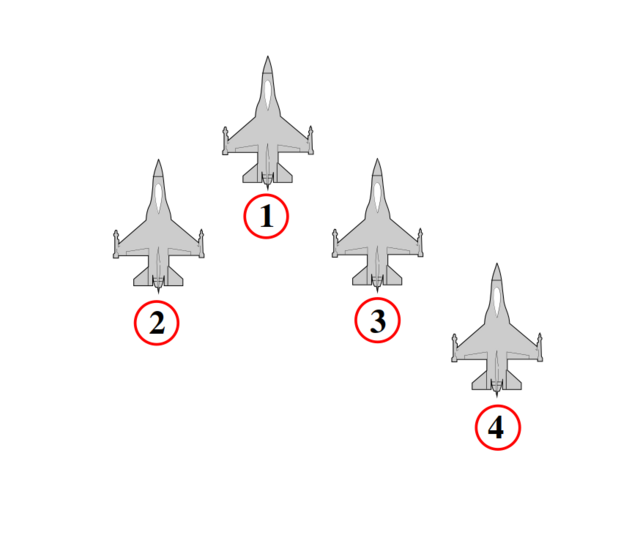
This formation, flown as a two-ship, gives the wingman a maneuvering cone from 30 to 60 degrees aft of line abreast and lateral spacing between 500 to 3,000 feet. Number Two maneuvers off lead and uses cutoff as necessary to maintain position. This formation is employed in situations where maximum maneuvering potential is desired. Arenas for use include holding in a tactical environment or maneuvering around obstacles or clouds. (See Below Figure, Fighting Wing Formation.)
Advantages:
- The formation allows the element to maintain flight integrity under marginal weather conditions or in rough terrain.
- Allows for cockpit heads-down time for administrative functions when in a low-threat arena where hard maneuvering is not required.
Disadvantages:
- Poor to nonexistent 6 o'clock coverage.
- Easy detection of formation by single threat.
Brevity Call
- Lead: Flight go Fighting Wing Left/Right.
- Wingman: 2.
Two-Ship Wedge
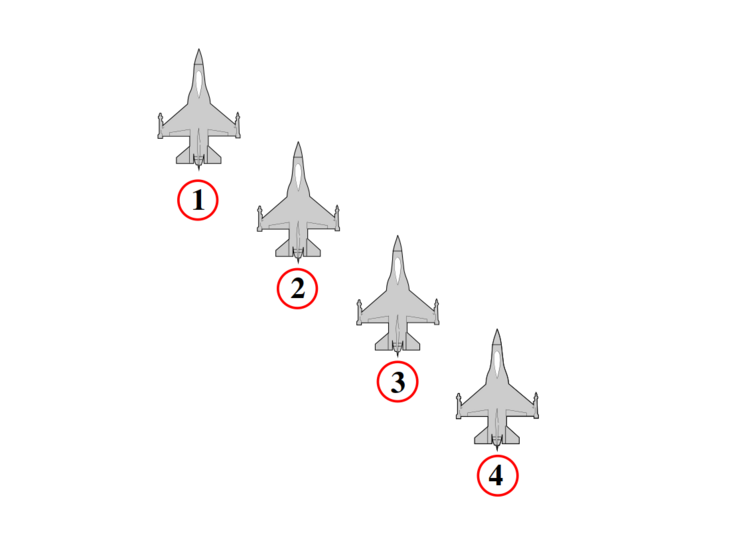
Wedge positions the wingman 30 to 60 degrees aft of the leader's 3/9 line, 3,000 to 6,000 feet back. The flight lead may extend the formation spacing out to 12,000 feet to meet particular situations or requirements. (See Below Figure, Two-Ship Wedge.)
- The advantages of wedge are that the leader is well protected in the 6 o'clock area and is free to maneuver aggressively. The wingman may switch sides as required during turns. The wingman may also switch sides as required to avoid terrain, obstacles, or weather but must return to the original side unless cleared by the leader.
- The most significant disadvantage of the wedge is that it provides little to no 6 o'clock protection for the wingman. Lead changes, if required, are difficult to execute.
Brevity Call
- Lead: Flight go Wedge Left/Right.
- Wingman: 2.
Three-Ship Formations
There may be occasions when a priority mission requires maximum available aircraft and a three-ship is the only alternative. Mutual support requirements to ensure survivability and recovery are paramount; therefore, a three-ship contingency should be briefed on all four-ship missions. On these occasions, the following three-ship formation discussion is applicable.
Vic
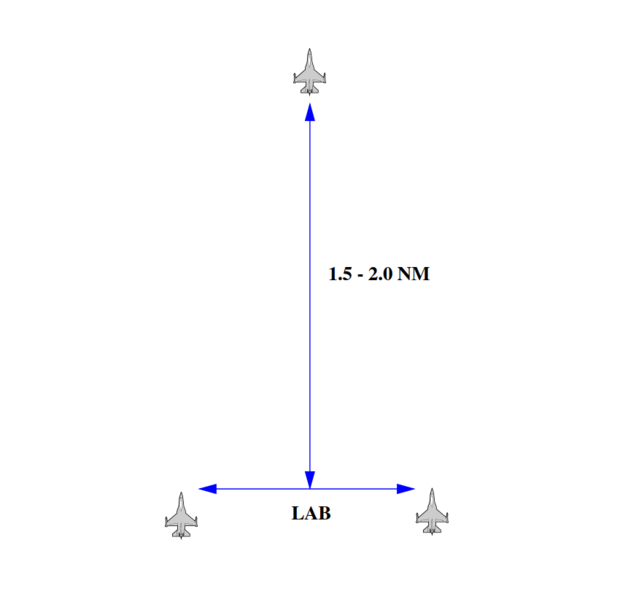
Lead flies 1.5 to 2 NM in front of the trailing element. The lead aircraft maneuvers as desired. The trailing element uses line abreast maneuvering to follow. (See Below Figure, Three-Ship Vic Formation.)
Brevity Call
- Lead: Flight go Vic.
- Wingman: 2.
- Element Lead: 3.
Fluid Three
This is the same as Fluid Four with one aircraft missing. If the three-ship is caused by one aircraft falling out from a briefed four-ship, the following position changes should be followed: if lead falls out, Number Three assumes lead and Number Two moves to line abreast; if Number Three falls out, Number Four moves up to line abreast; if Number Two or Number Four fall out, there are no changes. (See Below Figure, Three-Ship Fluid Three.)
Brevity Call
- Lead: Flight go Fluid.
- Wingman: 2.
- Element Lead: 3.
Spread Three
This is the same as Spread Four with one aircraft missing. Roles and responsibilities caused by fall out from a four-ship are the same as Fluid Three. (See Below Figure, Three-Ship Spread Three.)
Brevity Call
- Lead: Flight go Spread.
- Wingman: 2.
- Element Lead: 3.
Viper Three
This is the same as Viper Four with one aircraft missing. Roles and responsibilities caused by fall out from a four-ship are the same as Fluid Three. (See Below Figure, Three-Ship Viper Three.)
Brevity Call
- Lead: Flight go Viper.
- Wingman: 2.
- Element Lead: 3.
Four-Ship Formations
The four-ship is under the control of one flight lead and is employed as a single entity until such time as it is forced to separate into two elements. At no time should an element sacrifice element integrity attempting to maintain the four-ship formation. Each two-ship element should have its own radar and visual plan so that no changes will be required if the four-ship is split into two-ships.
Box/Offset Box
In Box formation, elements use the line abreast maneuvering and look-out principles. The trailing element takes 1.5 to 3 NM separation, depending on terrain and weather. The objective of the spacing is to give separation to avoid easy visual detection of the whole formation, while positioning the rear element in a good position to immediately engage an enemy converting on the lead element. Because the F-16 is difficult to see from a direct trail position, a slight offset will facilitate keeping sight of the lead element. Use of A/A tactical air navigation (TACAN) between the elements, and the radar in the rear element, will help keep the proper spacing. Element leaders initiate formation maneuvers. Number Three maneuvers to achieve pre-briefed spacing on the lead element (based on threat, mission, and weather). Flight leads may modify wingmen position to Wedge or Fighting Wing if desired. (See Below Figure, Four-Ship Offset Box.)
NOTE: In an ATC environment, if standard formation is required, the trailing element should fly closer than 1 NM and wingmen from 4,000 to 6,000 feet. Advantages:
- The formation provides excellent mutual support and lookout.
- The rear element is positioned to engage an adversary making a stern conversion on the lead element.
- It is difficult to visually acquire the entire flight.
- Element spacing for an attack is built into the formation.
Disadvantages:
- The formation is difficult to fly in poor visibility and rugged terrain.
- Depending on position, the trailing element may be momentarily mistaken as a threat, especially if staggered too much off to one side.
Brevity Call
- Lead: Flight go Box/Offset Box.
- Wingman: 2.
- Element Lead: 3.
- Element Wingman: 4.
Fluid Four
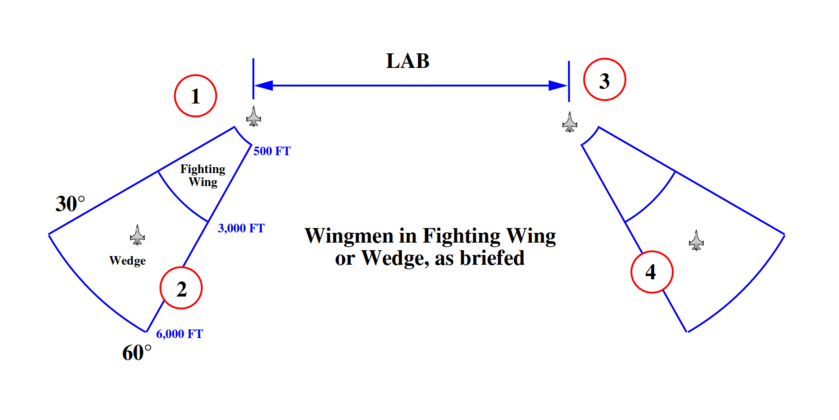
Element leads fly line abreast, with wingmen in Fighting Wing or Wedge (as briefed) on the outside of the formation. Number Three maneuvers off Number One. Num- ber Two and Number Four maneuver off their element leaders to maintain the outside of the formation. Element leads are responsible for deconfliction of elements when crossing the opposing element's 6 o'clock. At medium altitude, wingmen should stack away from the other element when turning. (See Below Figure, Fluid Four Formation.)
Advantages:
- Inexperienced wingmen are kept close for ease of maneuvering.
- Four-ship maneuverability is good.
- Good NVG formation when wingmen fly the Wedge position.
- Formation provides concentration of force.
- Easily converts to three-ship when one aircraft falls out.
Disadvantages:
- Adversary can acquire all four aircraft.
- Defensive maneuvering produces deconfliction challenges due to the proximity of aircraft.
- Cumbersome to maneuver at low altitude in rough terrain.
Brevity Call
- Lead: Flight go Fluid.
- Wingman: 2.
- Element Lead: 3.
- Element Wingman: 4.
Spread Four
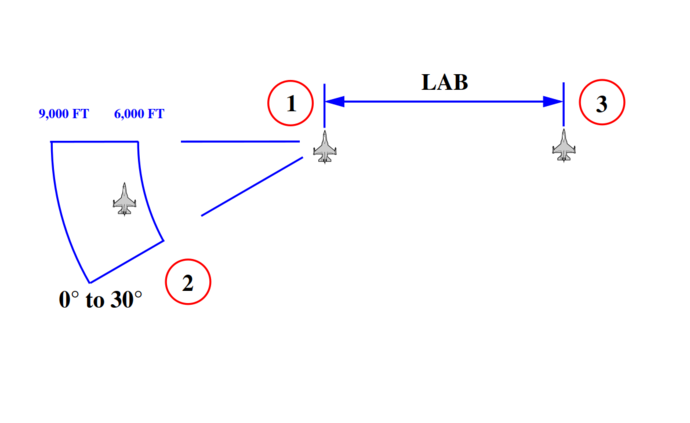
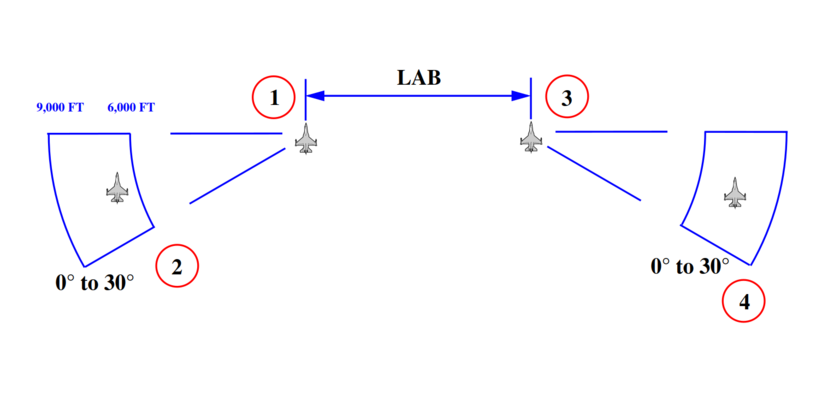
Element leads maintain line abreast, wingmen position themselves 0 to 30 degrees back from their element leads and 6,000 to 9,000 feet spread. Each element uses fluid maneuvering. Number Three flies off Number One (similar to Fluid Four). The elements are not always required to be line abreast. On some occasions they may be briefly in trail. (See Below Figure, Spread Four Formation.)
Advantages:
- Spread Four formation makes it difficult for an adversary to visually acquire the entire flight at once.
- Firepower is maximized for BVR weapons employment.
Disadvantages:
- Maneuvering is difficult if the line abreast position is maintained.
- Very difficult for wingmen to fly at low altitude.
Brevity Call
- Lead: Flight go Fluid.
- Wingman: 2.
- Element Lead: 3.
- Element Wingman: 4.
Viper Four
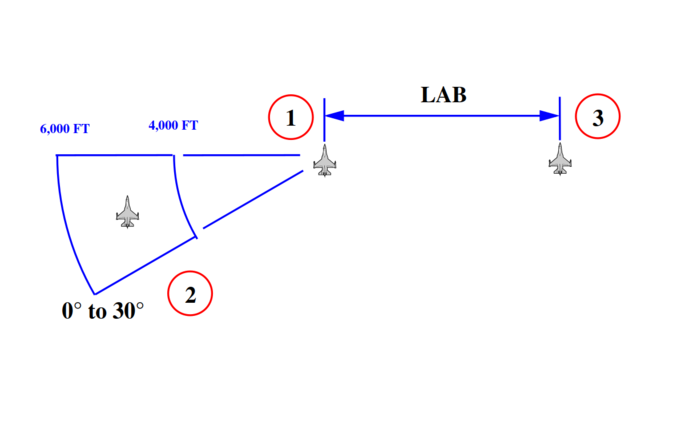
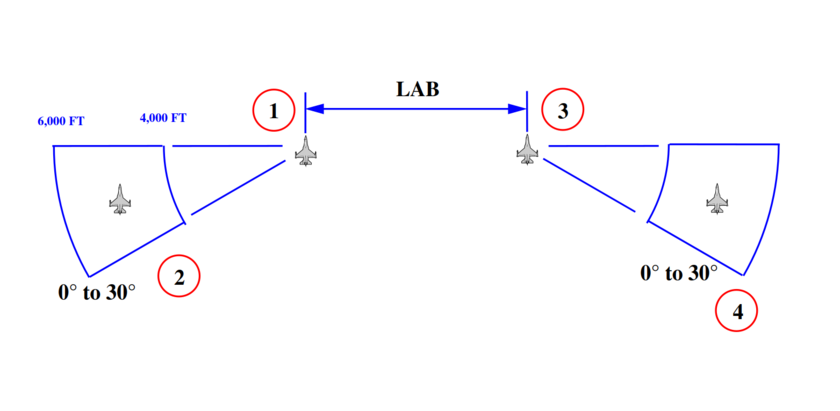
Element leads maintain line abreast, wingmen position themselves 0 to 30 degrees back from their element leads and 4,000 to 6,000 feet spread; this is the same as Spread Four, but wingmen fly a tighter position. (See Below Figure, Viper Four Formation.)
Brevity Call
- Lead: Flight go Viper.
- Wingman: 2.
- Element Lead: 3.
- Element Wingman: 4.
Four-Ship Line Abreast (4-Ship LAB)
Brevity Call
- Lead: Flight go Line Abreast.
- Wingman: 2.
- Element Lead: 3.
- Element Wingman: 4.
Four-Ship Wedge
Route
Arrowhead
Diamond
2-/3-/4-Ship Formations
Fingertip
Finger Four
Same as Fingertip but with more spacing up
Echelon
Trail
Ladder
Stack
Manoeuvres
There are two ways to initiated the manoeuvers, via Communication or via Signal.
Maneuvering With Unrestricted Communication
Radio Silent Maneuvering
Two-Ship Tactical Turns
Delayed 90° Turn
Delayed 45° Turn
Cross Turn
In Place 90
Shackle
2-/3-/4-Ship Tactical Turns
Hook Turn
