BVR
Beyond Visual Range (BVR) tactics refer to strategies used by military pilots to engage enemy aircraft beyond the range of visual identification. With advancements in technology, BVR combat has become increasingly prevalent in modern warfare, and has led to the development of highly sophisticated aircraft and weapons systems designed for long-range engagement.
BVR combat takes place at ranges beyond what the human eye can discern. This means that pilots must rely on a variety of sensors and systems to detect, track, and engage enemy aircraft. These sensors include radar, infrared imaging, and other electronic systems that provide situational awareness, as well as weapons systems that are designed to engage targets at extended ranges. The objective of BVR combat is to eliminate the enemy threat before they can get close enough to engage in a dogfight or launch their own weapons.
To achieve this objective, BVR tactics typically involve a series of steps. The first step is to detect the enemy threat. This can be accomplished through the use of radar, which can detect aircraft at long ranges. Once the enemy has been detected, pilots will attempt to identify the threat and determine whether it is hostile or friendly. This can be accomplished through a combination of visual identification, radio communication, and other means.
Once the threat has been identified as hostile, the next step is to track the target. This involves using radar, infrared imaging, and other sensors to continuously monitor the enemy aircraft and predict its movements. By tracking the target, pilots can predict where it will be in the future and plan their attack accordingly.
Finally, once the target has been tracked and its movements have been predicted, pilots will launch their weapons.
Learning objectives
- Understand why we need to follow the BVR Flow and Timeline.
- Learned the BVR Flow and Timeline.
- Learned to use brevity word to communication.
What formation and tac turns BVR use?
The most common formation in a BVR environment is the “Line abreast” formation, and “Hook turn’s” and “Delayed turns” are the most often used tac turns for BVR.
BVR Formations
BVR will be a continuous cycle of commit (heading to the adversary to shoot) and abort (turn away from adversary).
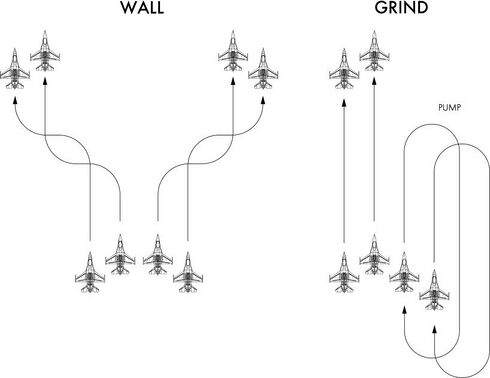
The leader has to decide the tactic prior to each commit. Commonly either Wall or Grind will be applied.
Wall
Deploys two elements line abreast.
Grind
Deploys two elements in trail formation.
When you decide the Grind tactic, Pump either one of the elements before pre-briefed Pump Range.
Wingman Roles in BVR
- Stay Visual on Lead (If lost visual on lead call “Blind”)
- Keep Formation to the Lead (Commonly line abreast is applied)
- Check Radar
Wingmen usually don’t have to watch radar that much unless AOR search is directed. This is because in a Visual Mutual
Support they should stay in visible formation so that leader and wingmen should see the same contact in their FCR page.
BVR Flow
Skate
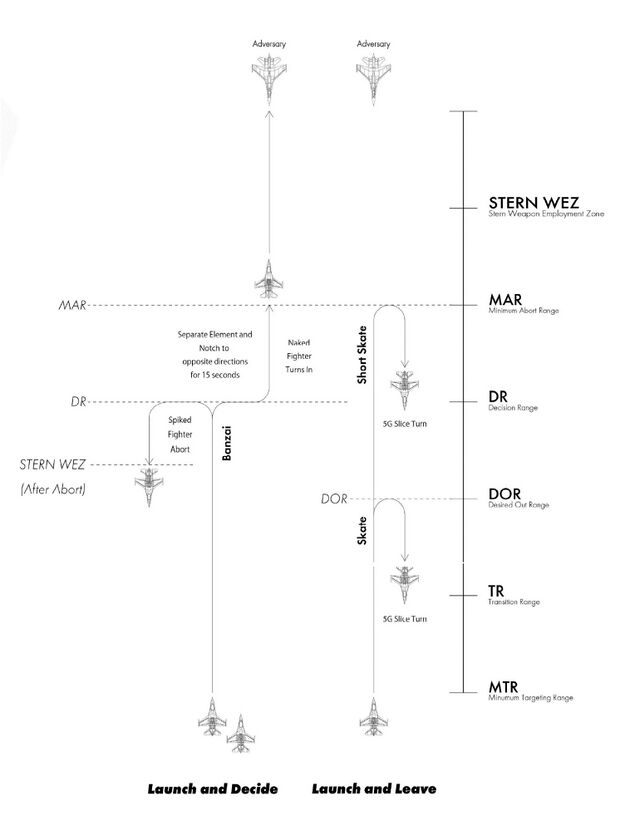
Skate is a “launch and leave” tactic. FOX3 before TR (Transition Range) will allow HUSKY before you reach DOR (Desired Out Range). You should abort before DOR and it would defeat the adversary's FLO (First Launch Opportunity) shot and preserve enough distance to recommit with “launch and decide” tactics.
DOR = DR + Adversary Closing Range while Aborting and Recommitment.
Short Skate
Short Skate is another “launch and leave” tactic. You should abort before MAR (Minimum Abort Range) or DR (Decision Range). Aborting before MAR would defeat the adversary's FLO (First Launch Opportunity).
MAR = Max F-POLE of FLO Shot + Turn Radius.
Banzai
Banzai is a “launch and decide” tactic. FOX3 before DR (Decision Range) and separate element for opposite direction to notch against adversary (for ex: if adversary is at 360 then notch to 270 and 90). Keep notching for pre-briefed time (commonly 15 seconds) and check if you and your wingman has been spiked or not. If spiked, then abort and you will be outside of a STERN WEZ. STERN WEZ is a range where an adversary's shot will hit you even if you are turning away from them. If you are naked and got no spike while notching, then turn in to pursue the adversary and push away them.
DR = STERN WEZ + Adversary Closing Range While Notching for 15 seconds than aborting.
BVR Timeline
MTR (Minimum Targeting Range)
The range that the element lead needs to target or share a group to ensure group elimination or support planned intercept flow in cases where the wingman has targeted first. MTR is also where flight members may auto target any unassigned group in their AOR(Area Of Responsibility) coverage in accordance with the targeting plan.
Brevity Call
- Lead: Flight go Wall, .
- Element Lead: Viper 1-3 Targeted East Group.
TR (Transition Range)
The minimum range at which the AIM-120 must be launched in order to achieve an active state and be out no later than DOR.
DOR (Desired Out Range)
The minimum range at which a fighter can execute the briefed notch maneuver, remain there for a pre-briefed period of time in an attempt to defeat spikes, and then execute an abort maneuver. This maneuver will kinematically defeat any missiles shot at the fighter and momentarily keep the fighter outside the threat's maximum stern weapons employment zone (WEZ) once the abort maneuver is completed. This definition does not address an adversary’s capability to eventually enter a stern WEZ by continuing to run down the fighter.
DR (Decision Range)
The minimum range at which an aircraft can execute the briefed notch maneuver, remain there for a pre-briefed period of time in an attempt to defeat spikes, and then execute an abort or exit maneuver. This will kinematically defeat any missiles shot at the fighter and momentarily keep the fighter outside the threat's max stern WEZ.
DR = STERN WEZ + Adversary closing range during 15sec notch + Margin t
MSR (Minimum Shot Range)
The minimum range at which the MRM must be launched in order to achieve an active state and be out no later than MAR.
MAR (Minimum Abort Range)
The range at which an aircraft can execute an MDS-specific standard abort maneuver and initially kinematically defeat any missiles and momentarily remain outside the adversary WEZ.
MAR = Max F-POLE of adversary's shot + Your Turn Radius + Margin
MRR (Minimum Recommit Range)
The minimum range at which the Fighter recommit, target and employ MRM while turning and remain outside of STERN WEZ. Assuming threat is HOT.
STERN WEZ
The maximum range at which an adversary's weapons can be effectively shot at fighters.
STERN WEZ = Range where adversary's shot hits you from your behind.
Targeting / Sorting
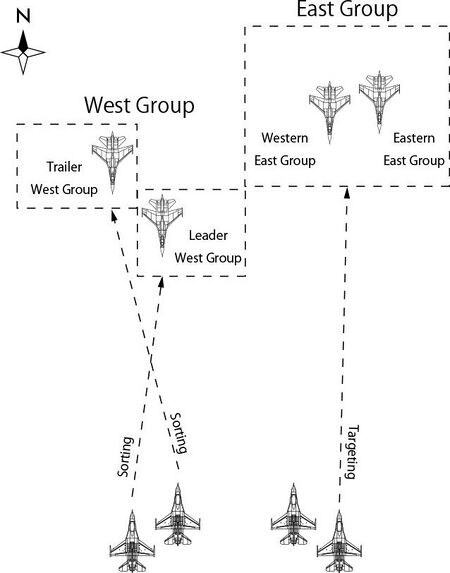
Targeting and Sorting is mainly to prevent multiple people from attacking the same target at the same time.
Targeting
The leader has to decide targeting before committing adversaries. If you are going to Short Skate you should decide it before MTR (Minimum Targeting Range).
Fighter targeted a group (contact within 3 nm) has a responsibility to engage the targeted group with a directed flow.
Once targeted a group you can FOX3 at pre-briefed timing. If you completed targeting, then call “<Callsign> Targeted <Targeted Group Labeling>” to Tac Channel.
Brevity Call
- Lead: Viper 1-1 Targeted West Group (B/E).
- Element Lead: Viper 1-3 Targeted East Group (B/E).
Sorting
Fighter Sorted an inner group has a responsibility to engage a sorted inner group with a directed flow. Once sorted an inner group you can FOX3 at pre-briefed timing. If you completed sorting, then call “<Callsign> Sorted (<Sorted Group Labeling>)” to Internal Channel.
Brevity Call
- Lead: 1 Sorted Trailer (West Group) (B/E).
- Wingman: 2 Sorted Leader (West Group) (B/E).


